GAME MOMENT x OFFENSE
POSSESSION STATUS x POSSESSION LOSS
MACRO MOMENT x FORWARD HALF DEFENSIVE PRESS
MICRO MOMENT x IDENTIFY THE MOST DANGEROUS OPPOSITION OUTLETS

GAME MOMENT x OFFENSE
POSSESSION STATUS x POSSESSION LOSS
MACRO MOMENT x FORWARD HALF DEFENSIVE PRESS
MICRO MOMENT x IDENTIFY THE MOST DANGEROUS OPPOSITION OUTLETS
GAME MOMENT x OFFENSE
POSSESSION STATUS x POSSESSION LOSS
MACRO MOMENT x FORWARD HALF DEFENSIVE PRESS
MICRO MOMENT x 1 METER RULE/TACKLE OR CORRAL
GAME MOMENT x OFFENSE
POSSESSION STATUS x POSSESSION LOSS
MACRO MOMENT x FORWARD HALF DEFENSIVE PRESS
MICRO MOMENT x KICK OUT ZONE FORMATION
As your game model is now about to get pretty busy, I’d suggest moving to an Excel spreadsheet or something similar like I have here:
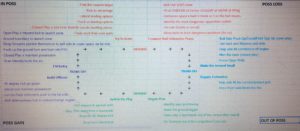
Micro moments are exactly that, the micro moments that make up your macro moments devised from your game moment.
It’s the process that goes into achieving the result.
So you might say for offense your game moment is “trying to score”, like I have above, and fair enough considering that’s how you win.
But what goes into that.
How do player move to create this?
How should the ball move to create this?
How should both of these happen when the ball is different positions on the ground?
How should they occur under fast and slow play conditions?
Do you want to play a similar style regardless of the slow/fast play or do you wanna be able to alter playing styles depending on the flow of the game or the position of the ball?
Like I said this the real thinking bit of the development of the game model.
I will go through each game moment with what I laid out above, remembering I did it almost 2 years ago so somethings are still relevant and some aren’t so much but I’ll address them in the videos.
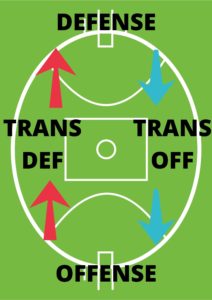
There are 4 game moments in team sport and within a game you are always in 1 of them but they can switch in a split second and in any order, especially in such a chaotic sport like football.
They are:
They can each be referred to game actions in specific parts of the ground but again they can occur anywhere on the feild and that part is also important to understand.
The image below shows the basic game moment loop it follows but as stated, that order is not always the same.
The next part to add into the game model template is the possession status which matches up with the game moments, but generally overlap from 1 game moment to the next and is what can show you how they can occur in all different orders throughout the 1 play.
They are:
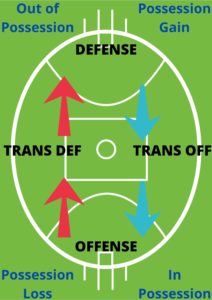
That’s the basic template.
I discovered game models about 4 years ago as my transition from playing to coaching began to really take shape and I’ve been a big fan of them ever since.
I usd the term game model over game plan because I belive a game model is vastly different from what a game plan is thought to be – especially in football circles.
Game plans usually revolve around specific ball movement, which is part of the game model, and midfeild set ups which is going with ther what you want to happen mantra versus the what does happen mantra that I follow.
Definitely train for what you want to happen but I belive it’sbuilt off of your foundation of already being extremely efficient with dealing with what does happen, not the other way around.
For example all local football clubs love training drills to look clean and pretty with predictable training drills which is great and all but it’s not a true reflection of what happens in agame which is messy and unpredictable.
I like to use game models to show foundation-based aspects of football that all players can perform, regardless of talent level, and as long as they put the time in to memorise the game model and are then disciplined enough to carry it out on game day, they’ll be solid contributors to your team each and every week whether they touch the ball 20 times or 5 times.
The different points I’ve highlighted here is from a game model I developed about a year and half ago and with football trends, and rules, changing pretty much every year at this point it’s not based on what I would do right now and also every team’s game model will be specific to them in regards to player personel, coaching beliefs, culture, ground size etc, so feel free to delete and add in what you feel is best into your own game modelfor best results.
Once you’ve completed your game model then feel free to send me a copy and I can take a look at it and see if it could be improved upon or maybe just to challenge a few things just make sure it’s rock solid because once it’s done you don’t want to be shifting the goal posts on your players or they’ll be in a constant state of confucison which is the total opposite of why a game model is developed in the first place.
There’s a few moving parts in all of this but it all ties in nicely at the end so strap yourself in!
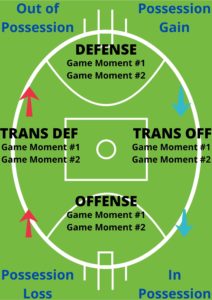
With our basic template completed it’s time to put your coaching hat on nice and tight as we move to macro moments.
Macro moments are the big rocks of your game moments – transition defense, defense, transition offense and offense.
I would stick to 2 macro moments per game moment, at least to start with.
Be sure to keep in mind the possession status as well which will help dictate what specific aspects you need to focus on at this time and when I say time, it could be as quick as 1-2 secs so the ability get the game model to memory and then to be able to shift your focus of attention on game dayis crucial.
With time of huge importance in football, especially if you don’t have a lot of it, the game model actually helps quicken up decision making and keeps “lag” time to a minimum.
Our graphic now shifts to this:
GAME MOMENT x OFFENSE
POSSESSION STATUS x POSSESSION LOSS
MACRO MOMENT x FORWARD HALF DEFENSIVE PRESS
MICRO MOMENT x ALLOW KICKS TO THE LEAST DANGEROUS POSITIONS
PART 40
Part 1 – Introduction
Part 2 – Warm Up / Kick Development / Defense
Part 3 – Line Work (Midfielders/Forwards/Backs)
The last portion of training is now the games portion which allows to playeres to put into a competitve situation all the different information they’ve taken in and processed during the session so far.
If you’ve designed your training sessions properly it will also add representation to the activities you’ve done leading up to know as well.
I’ve got 7 more of these sessions made up in my folder all consisting of completely different drills with each week building on the next so let me know your interest and if there’s a groundswell then I’ll release them them into a package for purchase.
GAMES DRILL – MIXED SQUARES
Players Required: Entire training group but break up into 3 groups of top senior, bottom senior/top reserve and bottom reserve/thirds groups so everyone is challenged as close as possible to their edge range.
Balls Required: 4
Space Required: Half of the Ground
Drill Level: Moderate to Hard
The numbers and area sizes I’ve gone with in the video aren’t set in stone as it will depend on your training group size but the idea is to use a big/kick, medium/hybrid and small/handball sized game.
BIG/KICK GAME
I would look at using a possession football game counting each kick that is marked by a teammate. If the ball hits the ground then play on but if it gets in dispute then it’s a turnover so the ball can hit the ground if a teammate can gather it and play on.
The ball hits-the-ground-turnover rule makes no sense in local/amateur football considering it spends most of the time there during our games – train what does happen not what you want to happen.
So if team A gets 8 possessions then turns the ball, over then they start from 8 next time they get it and so on for time.
MEDIUM/HYBRID GAME
Give each team a ratio they have to play by such as 3 kicks + 1 handball v 4 kicks + 1 groundball + 1 handball.
Teams score a point when they complete their ratio but if there is a turnover mid ratio then they start again.
To make it even harder you could have teams follow the ratio in order.
SMALL/HANDBALL GAME
4 Goal Game is a solid handball game to play in congestion a small to medium sized area but you could easily use 1 set 2 sets of goals in a smaller area.
You could roll with a Progressive Pressure Rondo Drill, a keepings off game like the kicking game but for handball or a ratio game with groundballs like the medium game.
Go silly.
How you score these games are also up to you depending on if you use a game based on scoring with goals or goal players or a game based on possession count (possessions in a row, time with ball etc).
As you’ve got 3 groups/6 teams you can also have the bottom team/s play less time as they will probably have less fitness than the top group/s and thus won’t be able to tolerate the same workload before fatigue sets in causing nothing but skill errors and potential injury now or later down the track.
Part 1 – Introduction
Part 2 – Warm Up / Kick Development / Defense
At this point we’re about 30 – 35mins into the session and it’s time to break into groups.
Grouping your players into their specific lines that they’ll most likley play in is all part of the stream lining approach as well as making training ore specific to each player.
So break your players up into backs, midfielders and forwards but there might be a little bit of switching of players depending on the drill as I’ll outline below.
MIDFIELD DRILL – STOPPAGE QUARTERBACK
Players Required: Depends on your total training numbers but you want to set up 4 groups of 4 – 6 players if possible which might mean you include all players in this drill or pull some half forwards and half backs from the other groups to make up the numbers but only if it allows you to still run the forwards and backs drills at the same time, otherwise use the entire squad for this one.
Balls Required: 4
Space Required: 35 x 35m
Drill Level: Moderate
Our home ground is literally a postage stamp (125 x 80m I reckon) so to be able to create room to play into we like to play out the back of the contest instead of simply running into congestion that’s simply there because they have nowhere else to go!
So this is my game model specific but you might have other tactics and strategies you’d rather focus on.
Level 1 – Outnumber game + quarterback waiting on the outside for the whistle who kicks to a lateral/or 45 degree lead coming from the next box
Level 2 – Outnumber game but the quarterback is 1 of the offensive players from the outnumber game so you can either nominate the player or nominate the side you play the ball out of and the closest player pulls out and the others get it to them for again hitting upa lead from the next box. This is probably your best option if training numbers are low but it’s will decrease the chance of success a fair bit from level 1.
Level 3 – Outnumber game + quarterback waiting on the outside hitting up the kick into the middle of the playing area which will require a kick into some congestion.
Level 4 – Outnumber game but the quarterback is 1 of the offensive players and you are to hit up the kick into the middle of the playing area again requiring a kick into congestion.
Level 5 – If you’re feeling extra spicy then introduce both leading options to the outside of the box and to the middle of the playing area but have the defender go with 1 of those options so the kicker must find the open option. With 1 defender success might come easy for the kicker as the defender might be too tired to actually get to 1 of the leading players but multiple defenders they’ll nominate between themselves who will defend the lead and it’ll be much harder as they’ll be less fatigued and the kicker won’t be aware of which defender to kick away from.
BACKS DRILL – SCAN AND KICK
Players Required: 10/group
Balls Required: 1/group
Space Required: 20m x 2om
Drill Level: Easy to Moderate
In most cases I would start with some game model rehearsal based activities such as the quarterback drill like above and the forward line drill below but for the backs that first kick has to be safe and it has to hit the target so as not to put the defense under repeat pressure on top of other backline players pushing forward to provide options up the ground leaving the defensive 50 vulnerable if there’s a turnover.
Level 1 – 1 side leading but have the kicker have to kick outside and inside their body
Level 2 – both sides leading but 1 side only leads every 2nd kick so it’s half the decision making requirement
Level 3 – both sides leading each time and the kicker can kick inside or outside their body depending on where the open target is
On top of these levels you could also challenge your better kickers by allowing them to attempt kicks with a defender but 2 misses in a single training session and they lose that privilege for the remainder of the drill.
Player 1 receives 20 passes from player 2 and see’s how many targets they can hit up and do each player 2 – 3 times each.
FORWARDS DRILL – GAME MODEL REHEARSAL
Players Required: 8/group
Balls Required: 1/group
Space Required: Forward Half of the Ground
Drill Level: Easy
Level 1 – As above
Level 2 – Add 1 defender to play against the player 2 in board kickor the player 3 and 4 fat side leads. The sole defender will start with each group in the congestion and can decide to go with whichever forward they like so there’s some decision making to be made by the other players there.
Level 2 – Add 2 defenders who can choose who they go with but also decreases the forward outnumber advantage
Level 3 – Add 3 defenders which brings the numbers to evens but defenders must man the mark of marked kicks
Level 4 – Add more players to the scenario